in this tutorial weãre going to learn toknit magic loop, toe-up socks. which is really one of my favorite ways toknit socks. toe-up is definitely my favorite, and i goback and forth between double pointed needles and using magic loop for my favorite. um, if you want to follow along with the patternweãre using here, itãs available for purchase and download over on my website, and iãvegiven you a link in the video description just below the video. the unique thing about this pattern is forthe first time ever, i include sizes for the whole family. men, women and kids.
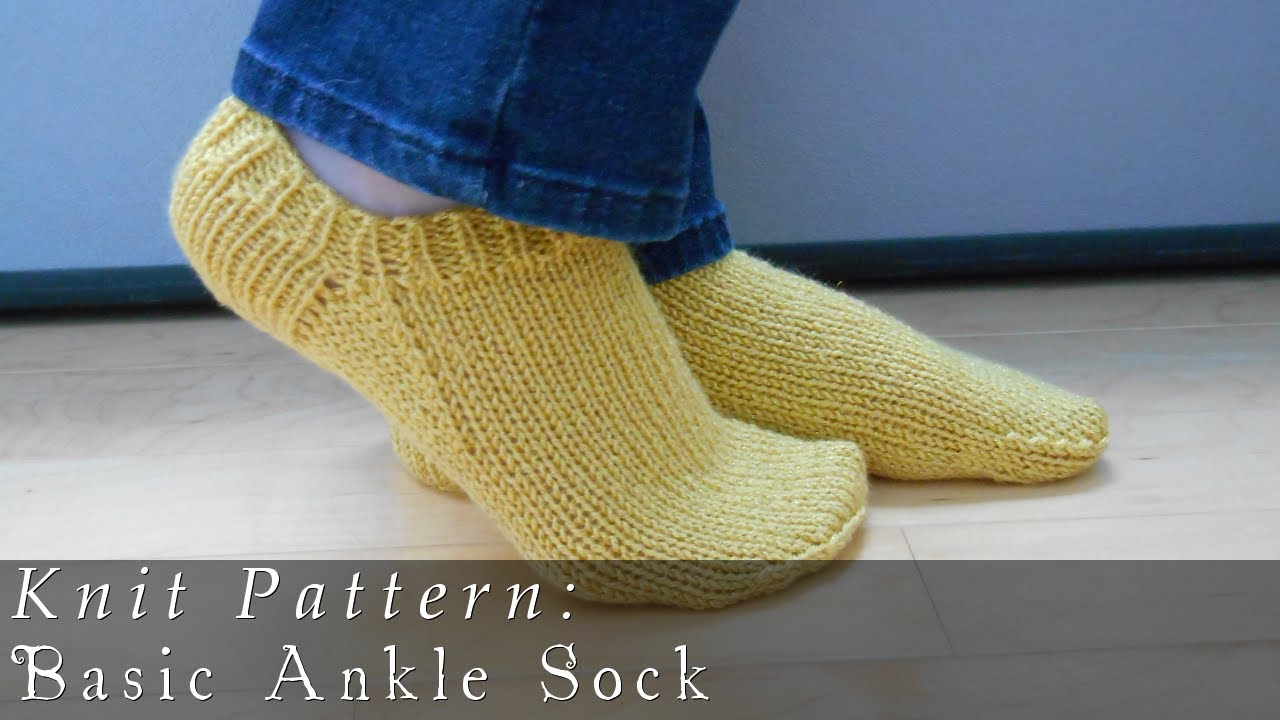
and these are the menãs socks. um, one of the benefits ã± well, iãll tellyou the benefits to both toe-up and magic loop. the benefit to toe-up, that i like the most,is that you can use all of your yarn, no leftovers. because you start at the toe, you knit themost important part of the foot first, the foot, and then you use up the rest of theyarn on the cuff, making it however long you can with the amount of yarn you have. and i like to not have leftovers [laughs],so thatãs important to me. and then magic loop, instead of using short,double pointed needles in a set of four or
five, you use one long circular needle. and because youãre not using several needles,you donãt have to readjust every third or every quarter of the stitches. half the stitches are on one cord, and halfare on the other, which makes it less fiddly. so i think this is a really great way to knitsocks, and iãm excited to teach it. please keep in mind that this is tutorial,weãre using worsted-weight yarn and much bigger needles than you would normally useto knit socks. sock yarn is really fine, and we normallyuse really tiny needles to knit that. weãre using bigger yarn ã± not this big ofneedles! these are just my sample needles.
[laughs] but this is so you can see what youãre doingreally easily, you learn the techniques, and then you can move on to other toe-up patternsand knit them magic loop style without any problem. itãs easy to adjust any toe-up sock patternto magic loop method. so, first up, weãre going to get startedwith the provisional cast on and the short row toe. because these are toe-up socks, we are goingto start at the toe, and itãs really unique the way this whole thing is put together.
we start with a provisional cast on. and thatallows us to work normally like we do from a cast on. we cast on and work one direction. but then weãre also able to unzip the provisionalcast on we stitched in to knit the other direction as well. and thatãs going to be right at the centerof the toes going this way. you donãt have to understand it to be ableto work it, but thatãs how itãs going to go. um, everything that you need is listed onmy webpage and in the pattern, but weãre going to start with a crochet hook and somescrap yarn in a color different than what
youãre using for the socks. so letãs get started with the provisionalcast on toe. here is a finished pair of the man sized socks. weãre going to start here with the provisionalcast on, and work our way around this way, and then knit the foot, and then pretty muchwork the same short rows that we did for the toe here for the heel. and then knit the cuff until weãre out ofyarn. okay. now for this example iãm using bulky yarn,and a much bigger crochet hook than i recommend
for the pattern. this is just so you can really see what iãmdoing. the very first thing iãm going to do is totie a knot in this yarn. a knot that i can feel, thatãs the wholepurpose of it is so i can feel it. then iãll tie a slip knot, a little waysup from there. i want to be able to identify easily whichside is the slip knot side. here iãm going to use my crochet hook, andweãre going to do some crochet chaining to start the cast-on. um, if youãve never done this before, youwant to have your left hand pincher fingers
always pinching low, close to the bottom ofthat last loop. you grab it and pull it through, grab it andpull it through. up from under, like that. this is just a basic crochet chain. and youãllfollow your pattern for your size to tell you how many you need to chain. i have not been counting. but a couple more should do me, and i needscissors. okay. break the yarn, and pull that last loopthrough. now, a crochet chain, when you look at thefront of it, it looks like a cast on row or
a bind off row. itãs a bunch of vs. but if you turn it over to the back, you havewhat most people call the ã¬spineã® of the crochet chain, or what i always call hyphens.[laughs] thatãs what they look like to me! little horizontal loops like this, that arenãttouching each other, but you can see them there. now this is when you need your knitting needles,and your actual sock yarn. starting with the end where the slip knotis, and you know where that is because you tied a little knot there, put your needlethrough one of the hyphens, and you want to attach your yarn.
just fold your yarn over making a loop, wrapit around the needle and pull it through. go into the next hyphen, wrap it and pullit through. this is like knitting with one needle. and do your best not to split any stitches.go cleanly in. and wrap it and pull it through. it will be harder to get the provisional caston out if you split stitches. iãm splitting this here, iãm going to domy best not to. sometimes i find that using a more blunt endedneedle when iãm picking up this row is easier, because sharp needles are more likely to splitthe stitch.
now that iãve picked those up, those lookgood, iãm just going to purl back across these stitches before we start the short rows. and weãre just using this circular needlefor flat knitting right now, weãre not knitting in the round yet. now weãre ready to start the short rows,and this is when the magic starts. knit across to the last stitch. and iãm going to do whatãs called a wrapand turn. itãs a little different on this very laststitch to work it, or at least thatãs how i like to do it.
pull the yarn forward between the two needles,slip that stitch from the left needle to the right, turn the work, make sure your yarnis coming around to the front like this, slip that stitch back, and then purl back acrossthe rest of the stitches. and when you pull that yarn around, youãllsee it wraps the base of that stitch. thatãs the wrap. then you purl back across to the last stitch. whoops, last stitch. then you pull the yarn back between the twoneedles, slip that stitch, turn your work, and make sure the yarnãs coming around fromthe outside like that, slip that stitch over
to the right needle, and knit across to thesecond stitch from the end. now this is more like how the rest of thewraps are going to go. forward between the two needles, slip thatstitch, back between the two needles, slip that stitch back over to the left needle. turn your work, purl back across to the secondto the last stitch. back between the two needles with your workingyarn, slip that stitch, forward between the two needles, slip that stitch back, turn yourwork. and iãll show you that one more time. because iãm using this big, bulky yarn, iãmnot following the numbers for the pattern.
weãre only going to wrap three stitches onthe outside. so iãm three stitches from the end now. pull the working yarn forward between thetwo needles, slip that stitch, back between the two needles, slip that stitch back overto the left needle, turn the work. and weãll do the same thing on the purl sideon the third stitch from the end. back between the two needles, slip that stitch,forward between the two needles, slip it back. your pattern will have you wrapping more stitchesthan this. but this is what weãre using here for the sake of example. and weãre already starting to get somethingthat is acting kind of toe shaped!
itãs going to become much more clear now. so now weãre going to pick up those wraps. iãm going to knit over to the third stitchfrom the end, the last stitch that i wrapped. and this is all clear in the pattern. and if you take a close look at this stitch,there is a horizontal bar running just underneath the base of the stitch, and thatãs the wrap. what i want to do is put my needle in thereand pick it up, and put it up on the needle with the stitch. and then i want to knit those two together.
and then iãm going to wrap this next stitch,giving it a second wrap. forward, slip, back, slip, turn the work. now weãre going to pick up a stitch on thepurl side. i have a lot of cord flopping around herethat iãm not using yet, we will be using it soon, though. this part is not even really magic loop yet. okay i want to pick up this first wrap onthe purl side, but i really want to make it look nice on the knit side. so iãm going to turn the work like this andfind the wrap, itãs the horizontal bar that
doesnãt match up with the rest of the stitches. pick it up, put it on the needle, and purlthose two stitches together. and iãm going to give the next stitch a secondwrap, and turn the work. and iãll show you this one more time. hereãs the second stitch from the end, itactually has two wraps. itãs your choice if you want to pick up oneor both of them. iãm going to pick up both of them, so nowi have three stitches there, iãm going to knit three together. and give the last stitch a second wrap.
okay, here we are two stitches from the endon the purl side. turn the work like this so i can see boththe wraps, pick one up and put it on the needle, pick the other one up put it on the needle. purl those three loops together. whoops, iãm splitting it. which is likelyto happen with three stitches there. and then give the last stitch a wrap. and youãll need to do that until youãvepicked up stitches all the way to the end, following the pattern, of course. weãre getting something very toe shaped now!
thatãs how youãll finish up the wrap andturns on the toe, and next up weãre going to talk about unzipping the provisional caston, and starting to knit magic loop in the round. now that youãve finished the short rows onthe toe, weãre ready to unzip the provisional cast on and start knitting in the round. letãs get right to it. here is the toe, and again, iãm using reallybulky yarn here so i can demonstrate this to you quickly. um, were you surprised that those short rowsended up coming out like this?
[laughs] and it looks like a toe?! and the red yarn here is my provisional caston, the crochet chain i started with. now to get started with unzipping the caston, set your work like this, and if you feel on your yarn, youãll feel the knot we tiedin the slip knot end over here on the left. we want the non slip knot side over here onthe right. and the cord should be coming out of, theneedle cord should be coming out of the stitches on the back. so take this needle [coughs], excuse me. take this needle over here on the right side,this is the one weãre going to be using.
and undo this crochet chain. all you did was pull that last thread throughthe last loop, so if you undo that, it will start unzipping. get yourself down to the first stitch. and, itãs going to start you out with a problemhere, because the first stitch is going to be wonky. and wouldnãt you know it? i split the yarnin the first stitch. hereãs my first stitch right here. the yarn actually, the provisional cast onactually runs through it.
can you see that? so iãm going to put my yarn in there ã± iãmsorry. put my needle in there and then pull that yarn out. now thatãs the only really wonky one. therest of them are going to be easier. you see, thereãs the provisional cast on.right under it, we see a v. thatãs the stitch we want to pick up. and if you put your needle behind and throughthe right leg of that v, youãve got it. and then you can unzip that stitch. put your needle behind the v of the next one,unzip that stitch.
or if youãre like me, i like to go throughseveral at once. again iãm just picking up the right leg ofthat stitch. and then unzip the provisional cast on, severalat a time. now i was hoping this wouldnãt happen, butiãm kind of glad it did. i must have split a stitch, because this isnãtgoing any further. and if you look, youãll find some yarn inthe color of your crochet chain that you can snip, and itãs funny to think that itãsusually just barely one little fiber of yarn thatãs holding the whole thing up. but if you snip it, then you can get the restof the chain undone.
so go back across all of these, picking themup. i canãt quite see where my last one is. but i just counted. this is freaking me out ã± there should beone more. oh! i see it! there we go ã± iãm glad i was able to seeit! this bulky yarn does have itãs benefits there! so now weãre ready to start knitting in theround. if you turn your work, youãll see that yourworking yarn is coming from this side over
here, i just flipped it. and this is where the fun starts. the funtv knitting, magic loop knitting. so your working yarn is coming from this stitchhere. when we get started, itãs a little bit different in subsequent rows. your tail end is coming from the back. line up your needles like this, and pull theback needle long. this is the one weãre going to hold in ourright hand to knit with. and weãre going to be knitting off the leftneedle just like normal. so you knit across these stitches.
okay, and weãve reached the end here. so,iãm going to turn the work. line up the needles again. whoops ã± i need to explain it as i do it!my hands are on auto pilot here! line up the needles, pull the back needlelong, and knit across the stitches on the front needle. and thatãs it! iãll show you one more time. this is the beauty of magic loop. turn your work.
line up your needles. pull the back needle long, and knit acrossthe stitches on the front needle. and thatãs going to get you through the wholefoot of the sock. youãll want to follow the pattern to knowhow long of a foot to knit for the different sizes, and then next up weãre going to talkabout doing the same wrap and turns to create the heel of the sock. if youãve finished knitting the foot of yoursock, and probably watched at least one good movie while you were doing that, weãre readyto start the same short row heel turns ã± same short row turns as we did for the toe,for the heel.
letãs take a look. now iãve switched to not only an itty bittysample, but iãm now using the correct weight of yarn and needles that we use, that i giveyou in the pattern. now, youãve knit the whole sock, the lengthyou need it, and weãre ready to start doing the same wrap and turns on the heel. so i have my needles lined up, iãll pullthe back one long. and this is a really simple concept iãm goingto show you, which is why iãm using this smaller size. you are going to do the exact same thing youdid with the toe on the heel.
itãs amazing that the same technique worksto turn the heel. but instead of having a provisional cast on,you have these stitches hanging out here on this cord, which is going to act just likethe provisional cast on did in the toe. so iãm going to knit up to the last stitchand start my wraps and turns. and then turn the work, and youãre workingfrom the wrong side, and this cord is just hanging there. youãre not really knitting magic loop anymore. going from those bulky needles to these smallerneedles is so nice for me! i can knit so much better on smaller needles! [laughs]
you see there, iãm just turning the workand working back and forth while those other stitches are hanging out there on the cord. and iãll go through and get all my wrapsfinished, and then iãll go back through again and pick up those wraps, the exact same wayi did on the toe. and when youãre finished with that, whenyouãre finished turning the heel, your work will look like this. and i want to show you how to go from knittingthe heel to working in the round again. i give you some instructions in the pattern,but just in case. before you start knitting the two by two rib,i tell you to knit a couple of rows plain,
before you go into the rib. and one reason is because itãs nice to havethe ribbing up out of the back of your shoe or whatever, but also we can use those extracouple of plain knitting rounds to pick up stitches where there might be holes, justin case. now after you knit the heel, turn the heelon this side, you can end up with gaps here. and thatãs kind of a normal part of toe-upsock knitting. but theyãre so easy to fix. and thatãs what i want to show you. iãm going to pull the back needle long, andknit across these stitches, weãre actually going to start knitting in the round again.
and when i get to the end of this, iãm ina spot where i can potentially have a hole in my sock. so iãm going to pick up an extra stitch here,just to help close the gap. and to do that, iãll find a spot where idonãt think itãs going to pull to much, and test it out, and go under a couple ofthreads there, of yarn, there that looks good. wrap it and pull it through, just like whenyou were picking up stitches in the provisional cast on. and give it a tug, and it should look good,it shouldnãt pull and make a different looking hole, it should actually fill up that hole.
line up my needles again, pull that back needlelong, and just keep going, weãre knitting in the round now. and on this first round, iãm going to pickup stitches like that, and then on the next round, when i get to the end here, iãll knittwo together, get to the end here, knit two together, to eliminate those extra stitchesthat i picked up. so that i have the correct number. and one thing that i didnãt mention, thati always like to do, is i use one of these little diaper pin clippie markers, and clipit to the sock at the spot between the needles that is the beginning of my round.
and thatãs how i will remember itãs thebeginning of my round. next up weãre going to talk about knittingin two by two rib for the cuff, and the special bind off that we use to make sure itãs reallystretchy on the calf. weãve got one last little bit of instructionto help you with questions you might have in knitting the cuff. letãs take a quick look. hereãs the sock, and weãre using two bytwo rib, which is a really nice, stretchy cuff on the sock. and youãll follow your pattern to get upto that spot.
but here i am on my teeny tiny little sample. ready to work the two by two rib. just like with the rest of the sock weãvebeen knitting, iãll pull the back needle long. and iãll start with two knit stitches, whichyou should be very good at by now. and then to go into the purl stitches, i pullthe yarn forward between the two needles, and purl two, and then back between the twoneedles to knit two. back to knit two, forward to purl two. and you may need to rearrange the stitcheson the needle. i like to always end with purl
two. depending on your size, you might need toslide two of the stitches over to the other needle. if you end with knit two, that means you haveto start with purl two on the other side, and that is too much to think about if youãretrying to watch tv. okay, thatãs working the ribbing. now i wantto show you how to do this really stretchy bind off. you donãt want a tight bind off, becauseyouãll never get it over your foot, and you donãt want something that is so loose thatit ends up being kind of fluted.
so i have what i called a modified yobo, yarnover bind off. because itãs not a straight yarn over bind off, itãs actually two regularbind offs and then a yarn over bind off. and this is what it looks like. start by knitting two, bind off one. knitone, bind off one. and then yarn over. pull the yarn forwardbetween the two needles, bind off over that yarn over, and thatãs the sequence. so knit one, bind off one. knit one, bindoff a second one. yarn over, bind off. itãs giving us an extra stitch every twostitches. knit one, bind off, knit two, bind off, yarnover, bind off.
i hope you understand! [laughs] iãm not readyto bind off on this sock, that was just to show you how to do it. anyway, good luck with your toe-up magic loopsocks. [music]